Session Logs
Each Session produces two main logs which allow for analysis of the results afterwards.
The Ganglion passes data to the application in packets consisting of a number of records for each electrode. The first of these two logs provides a summary of the data for each packet. The second summarises the data by prompt. The prompt is the instruction to the subject to imagine movement on the Left side of the body, the Right side or no movement at all – Centre. (see the short video on the Home page). Since the prompts change at intervals, the number of records will reflect how long the session lasted. Details and examples of both of these logs are given below.
Additionally, there are optional logs which track the stages of signal processing for the data in each packet. Once the system is verified as processing the data correctly, these logs can be commented out in the code. They are left available in case deeper analysis of the processing becomes necessary. Again, samples and explanations are provided below.
Packet Summary Log
Here is an extract from a Packet Summary Log. Please don’t examine the values in it too closely. It is just an example.

Event-Related Desynchronization (ERD)
At this point it is necessary to understand this counterintuitive point. Mu rhythm decreases on the opposite side of imagined movement because that part of the brain is actively preparing for action—even if no movement happens.
Here’s a simple breakdown:
🧠 Mu rhythm (8–13 Hz) is like the brain’s “idling” signal in the sensorimotor cortex. When you’re not moving or thinking about movement, it hums along steadily.
✋ Imagining movement—say, moving your right hand—activates the left sensorimotor cortex (because motor control is contralateral).
🔻 This activation suppresses the mu rhythm on that side. It’s like revving the engine: the idling signal fades because the brain is shifting from rest to readiness.
🧘 Even though the movement is only imagined, the brain still engages the motor planning areas as if it were preparing to move. That’s why the mu rhythm drops on the opposite side.
This phenomenon is called event-related desynchronization (ERD), and it’s a key signal used in brain-computer interfaces and neurofeedback systems.
In the session Packet Summary Log, ERD values are shown as ratios of current band power to the calibrated baseline.
A value of 1.0 means the band power is equal to baseline (no change).
Values below 1.0 mean suppression (the rhythm is weaker than baseline).
Values above 1.0 mean rebound or synchronization (the rhythm is stronger than baseline).
For example:
0.20 means the current band power is 20% of baseline (strong suppression).
0.80 means the current band power is 80% of baseline (moderate suppression).
1.20 means the current band power is 20% higher than baseline (rebound).
The beta frequency band responds in a similar way and so can complement the mu measurements.
Lateralisation Index (LI)
Once the system calculates how much suppression occurred (ERD), it also works out which side of the brain suppressed more. That’s what the Lateralisation Index (LI) shows.
Here’s how it works:
LI compares the adjusted band powers on the left and right sides of the brain.
It gives a number between –1 and +1:
LI > 0 → more suppression on the right side.
LI < 0 → more suppression on the left side.
LI ≈ 0 → suppression is balanced.
This helps the system decide whether the suppression happened on the correct side for the prompt. For example:
If the prompt says “imagine moving your left hand,” we expect suppression on the right side of the brain.
If the prompt is “centre,” we expect suppression to be evenly balanced.
You’ll see LI values in the log for both Mu and Beta bands, at both central (C3/C4) and parietal (P3/P4) sites.
Scoring
Once the ERD and Lateralisation Index (LI) are calculated, the system checks whether your brain activity matches the prompt. Each packet is scored based on suppression depth and directional accuracy.
Suppression check: The system looks for a drop in band power compared to baseline. In the log, ERD values are stored as fractional changes (e.g. 0.20 = 20%). A lower value means stronger suppression.
Directional check: The system then checks whether suppression occurred on the correct side of the brain for the prompt:
Left prompt → suppression expected on the right (C4)
Right prompt → suppression expected on the left (C3)
Centre prompt → suppression should be balanced
Success score: If both checks pass, the packet is marked as a success. The
SuccessScorecolumn shows how well the packet matched the expected pattern:100 = strong suppression on the correct side
50 = partial match or weaker suppression
0 = no suppression or wrong side
These scores are written to the Packet Log and used to track how closely your brain activity followed the imagined task.
Prompt Summary Log
Here is an extract from a Prompt Summary Log.
This table gives an overall view of the session, showing how your brain responded to each prompt. Each row represents one prompt (e.g. “Left”, “Centre”), and the columns show average values across all packets processed during that prompt.
Here’s what’s included:
Average ERD values for each electrode and frequency band These show how much suppression occurred in the mu and beta rhythms. Lower values (below 1.0) indicate stronger suppression.
Lateralisation Index (LI) averages These show which side of the brain was more suppressed. Positive values mean more suppression on the right; negative values mean more on the left; values near zero mean balanced.
Final Success Score This is a simple average of the success scores for all packets in that prompt. It reflects how closely your brain activity matched what the prompt was asking you to imagine.
This summary is useful for comparing prompts within a session, spotting patterns across sessions, and tracking progress over time. For example, you might notice that “Centre” prompts tend to score higher, or that “Left” prompts improve across sessions.
⚠️ This example is just a placeholder — the numbers shown here are not physiologically meaningful and should not be scrutinised.
Packet Processing Logs
During the development and testing phase, I have added six more logs. Sounds a lot but these are optional and can be commented out in the code when not required. They are produced at the end of each stage of the processing of a packet.
They fall into two groups. The first four record the results of the use of BrainFlow functions on a packet. Note that the log does not contain all packets in the session, it is cleared after every packet so it represents the most recent packet processed. I included these because I wanted to see the results of the BrainFlow functions just out of interest.
BrainFlow Processing
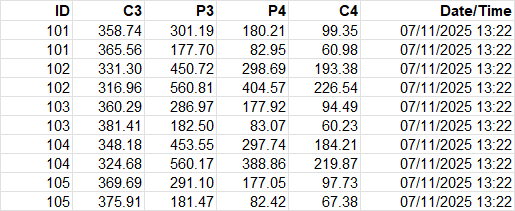
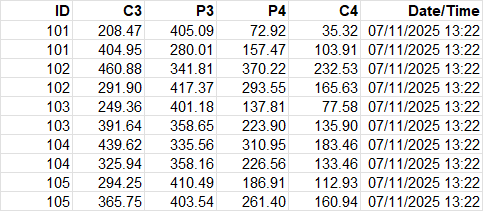
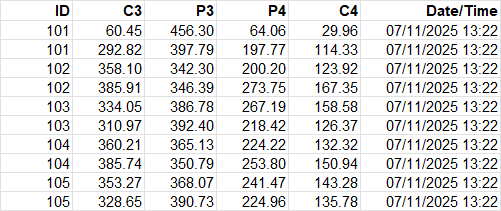
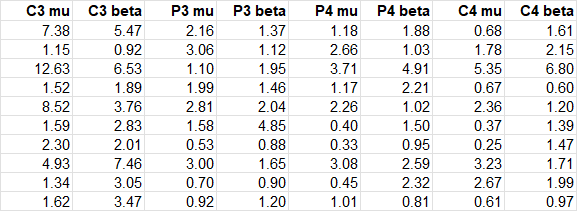
The first log records the unprocessed data arriving in a packet from the Ganglion. The second step is to remove the effects of mains electricity supply interference. This involves a Notch Filter and the frequency to remove is 50Hz in the UK. So the second log, Step 2, shows the Notch filtered data for the packet. This data is then processed by the Denoising function – to remove noise surprisingly enough. The Denoised data is written to the Step 3 log. The Denoised data is then processed by BrainFlow filters which give a figure for the Band Power from the electrode at the range of frequencies specified. I call this twice because I want separate Band Powers for the mu range of frequencies and the beta range. This results in my Raw Band Power log. A snippet is shown below from each of these logs, just for interest. My processing begins at this stage so I will comment out the first three logs once I am confident that I am calling these functions correctly. Then we will look more closely at the processing of the Raw Band Power log.
Processing of Band Powers
This is the stage where I start to interfere and to turn the raw band power values into a left-right hemisphere balance. The first step is to use the calibration data where, before the session, I recorded values for the background activity of the brain at each electrode at each frequency. This can vary of course so I recalibrate before each session, recording band power values for each electrode/frequency band while thinking about nothing in particular, particularly movement. I will post the method I use for this, and how I avoid negative band powers as a result. I’m very much open to suggestions on how I can improve this process. It results in an adjusted band power which I also output to a log. Again, only the most recent packet data are held. The example below is from a different session to the raw band power above so please don’t try to derive one from the other.
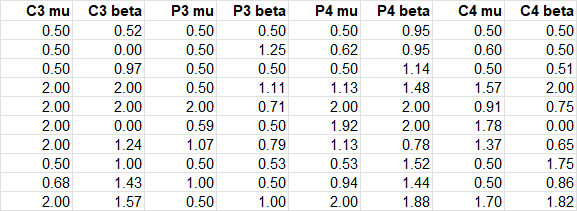
The data are then processed to produce a balance measure for each hemisphere. The data from the table above are used to create a percentage Left-Right value for each electrode pair at each frequency band and this is put out as the Step 6 log. The packet Left-Right balance information is used to drive the expansion and contraction of the blue circles providing feedback to the subject.
The software process then goes back to the adjusted band power figures and derives the results described in the Packet Summary log at the top of the page The packet record is then written to the Packet Summary Log – which was where this page started.

